

Before I start, let me make one thing clear. After the SHTF, the only way to heal cavities is to actually not get one. Seek to stop them as far as possible, rather than repair them. You can start by cutting on sugar beverages, not just fizzy ones, but fruit juices too, and make sure you use toothpaste based on fluoride whilst you can. The history of dentistry before anesthesia and modern antibiotics wasn’t a pretty one, and we’ll be back there once again when the SHTF. Personally, I’ll give you a taste of what it was like having a toothache back in the day.
 This excerpt was taken from the book, “Teeth, Teeth, Teeth” by James Wynbrandt:
“A friend told me of a man who with two others left the state of Washington for fur trapping in severe remote far northern Canada. They expected to be and were snowed in for a long winter. They had a comfortable cabin and ample supplies but couldn’t and didn’t expect to communicate with others. One suffered a toothache so unbearably painful he shot and killed himself.”
Is this true, I don’t know, but I’m sure many of you reading this, have felt the pain of toothache.
With this in mind, let’s look at the options for managing a cavity when there’s no anesthesia or dentists to help.
Related: Making Raw Apple Cider Vinegar at Home
Basic Steps to Filling a Cavity
NOTE: The sooner you can tackle the cavity, the easier it will be and the less chance of infection.
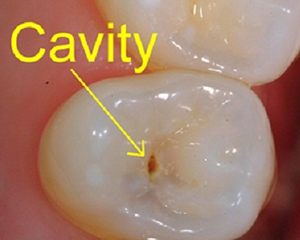
- Inspect the cavity for decay, noting the extent
- Give the patent some form of anesthesia (see below for natural options if you don’t have any stock of pain killer available)
- Clean the cavity and remove any decay using a tooth pick tool
- Dry the cavity – it is very important the cavity is dry as water can affect the cement
- Prepare a cavity cement (see below for alternatives if you don’t have any dental cement)
- Fill the cavity with the cement
NOTE: Keep everything sterile – your tools and yourself.
Ideas for Things to Stock Up On Before the SHTF
It is an excellent idea to stock up on the following items in readiness for toothache when the SHTF:
- Fluoride toothpaste
- DIY dentistry kits (available from pharmacies)
- Glass ionomer dental cement or Zinc Oxide and Eugenol liquid
- Pain relief gel (available from pharmacies)
- Dentist tool kits, which include, tweezers, mirror, pick tool (available online)
Getting at the Source of the Trouble: The Tools of the Trade
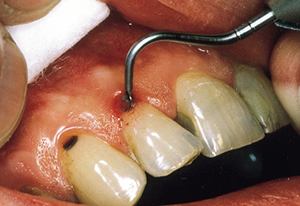
The trouble with dentistry is that you have a small space to deal with. Getting at a tooth, especially the molars near the back of the mouth. So, you need the right tools for the job. The first job is to clean a cavity, less so when the cavity is created by a pre-existing amalgam which falls out. The methods to locate a cavity and to clean it are:
- A small mirror that can fit in the mouth to let you see the cavity
- A tool that is angled and has a sharp edge so that you can get at the cavity and that can help clean it.
Dentists in modern times use an electrically-powered drill to clean up the decay. The probability of having power after the SHTF is pretty low (unless you have a home grown generator). So lets assume you don’t have any electricity – like in a total EMP Blackout. In this case, the cavity needs to be found. When you find it, you need to be careful to clean all the debris out of the cavity, and particularly the decay. This is done manually and can be a painful process as there is a high likelihood that the tooth nerve will be affected. I’ve experienced this myself, I can tell you it’s really horrible pain. However, if you leave any decay behind, once you fill the gap, the decay will continue, causing even more problems and pain.
An Experiment in Painless Decay Removal
Caries removal using Carisolv
Some research has been done on preventing decay without the need for a hammer. The research focused on the use of a combination of amino acids and hypochlorite for sodium. Through clinical trials it has been shown that the mixture prevents decay over a duration of 5-15 minutes and is painless. Here in the article, you can read the full transcript about the method – Nature.
Buying the gel online isn’t easy, but it could become more widely available over the next few years.
Pain Relief and Antiseptic
If you haven’t loaded up on pain medication or antiseptic then you’ll have to find a natural alternative. Over the millennia, humans have dealt with toothache pain relief. The Greek physician, Galen, born in 130AD has been recorded using pickled chrysanthemum root, which was successful but also induced loosening of the surrounding teeth. In Europe during the 13th century, ‘night sponges’ were used, consisting of sponges immersed in a concentrated hemlock, opium, henbane and lettuce seeds – I’m sure that would do the trick…
Some natural pain relief and antiseptic that is a little easier to get hold of than opium are:
- I have had clove oil applied by a professional dentist myself to an open wound where a wisdom tooth was removed and it did help. To make up some clove oil, take two cloves and grind them to a powder. Add a little oil and create a mixture; which is placed on and around the infected tooth.
- Warm, salty water: A simple but very effective way to kill off bacteria. Just swish the salty solution around your mouth; focusing on the infected area. This will kill bacteria and help relive the pain of the cavity before attending to it.
- Powdered ginger and cayenne pepper: Make a paste of these two ingredients with a little water and place o the infected tooth. Helps with toothache.
- Ice: Ice if you can get hold of some, is a great pain relief method as it simply numbs the surrounding area.
- Natural salicylates: These are the derivative to modern aspirin and found in various leaves, such as birch leaves and white willow bark – chew on the leaves or the bark to relieve pain.
Filling the Cavity
If you haven’t stocked up on cavity cement before the SHTF, then you’ll need to find some alternatives. However, do try and keep a good supply of the glass ionomer available as it is an effective cavity filler and really easy to use – you don’t need UV light to set it, for example.
Using Cavity Cement
Once the cavity has been cleaned and dried out, pace a small piece of cotton wool or tissue in the cavity to keep dry.
You can use Zinc Oxide powder to create cavity cement and liquid Eugenol. Eugenol liquid can irritate the gums, so be careful. Mix the zinc oxide powder on a hard flat surface ad a few drops of the Eugenol liquid together, like a ceramic tile. When thick and not sticky it works best. You can say if it’s not ready by rolling it between your fingers – if it’s sticking, if it’s not ready, you can add a bit more zinc oxide to get it ready.
Pull the cotton wool or tissue out of the cavity once it is ready, and fill the cavity with cement. Using something like a wood tooth pick or similar to smooth it out. Use your dentist tools to remove any cement that spills outside the cavity before setting. Try to smooth down the surface of the cement as much as possible, to ensure that the entire cavity is filled. My dentist would make me bite down to see if there are any rough edges left over on some paper.
After the filling is finished, you should not eat or drink anything for around 1-2 hours to give it time to set.
Final Note: Oil Pulling
There is a procedure called ‘oil pulling’ which pretends to be a cure for cavities. I can’t see any real proof that this approach works, but in using it I can’t see any real damage either. The technique recommends you use an oil, like coconut oil, which you swing around your mouth every morning for 20 minutes before consuming the meal. Apparently, the oil ‘removes impurities’ and can efficiently repair the cavity by removing or reducing the decay in a cavity.


 in Cereal?")

