
Do you wanna know the secret behind a great camping trip? Well, apart from flying solo or going with you SO, there’s also that sprinkle of magic called food. Yes, I know that most of you prefer a quick snack (MREs, poached eggs, may a couple of veggies), but what if I told you that you could actually enjoy a meal fit for a king’s table while backpacking?
Granted, it sounds like a contradiction in terms since camping has always been about leaving behind the hustle and bustle of the big city, which, incidentally includes fancy eateries and heavy cooking gear.
Well, the recipe I’m about to show you will not only blow your mind but will surely make the question the ways you chose to cook your Sunday roast. Anyway, as the title suggests, the only cooking tools you’ll need are the ones that should be included in your backpack or bug out bag.
Now, for those of you who are wondering about the cooking machine, I would recommend a simple and, if possible, firebox. Of course, you can always try your luck with a gas-powered stove.
For my part, I went with option A, since nothing beats that smoky flavor that only charcoal can provide. Moreover, since this is a 7-hour roast, I don’t think it would be a good idea to pack extra gas tanks just to cook one hunk of meat.
So, without further ado, here’s how to prepare your first 7-hour roast beef.
Related: How To Make Delicious Lard With 2 Years Shelf-Life (+ 5 Tasty Recipes)
Gathering the ingredients
A simple dish calls for basic ingredients: salt, pepper, a bit of vegetable oil, and a dash of thyme (pairs divinely with beef). As for the cut, T-bone’s good, but a chuck steak’s better. As I said – simple stuff.
Now, for the rest of the stuff: one firebox filled with charcoal, one firestarter, and your camping pan (make sure that it’s one of those models that come with clamps). If you don’t have such a pan, you can always take a regular one from home and use a metallic bowl as a lid – clamp it in place using regular paper clips.
So, did you gather your stuff? Great! Now find a good spot and let’s work some magic.
How to prepare a 7-hour beef roast

Step 1. Find a good spot to set up your firebox.
Remember your grills safety training. We don’t wildfires now, do we? Best would be to pick a barren spot, away from trees or any vegetation. When you’re done, place a piece of paper on the bottom of the firebox and stack some tinder.
Fire it up and start shoveling coals once the fire picks up in speed. I wouldn’t recommend using lighter fluid or whatever, because your roast is going to end up tasting like gasoline.
Step 2. Prepare the roast beef.
If you’re not in a hurry, you can marinate the roast beef for a couple of hours before the cooking part. I would venture to say that two-and-a-half hours are more than enough for the marinade to get into the beef. Regarding the latter, don’t overcomplicate things; in a zip-lock bag, add water, sugar, salt, pepper, some chili flakes for a kick, a couple of crushed garlic cloves, and two tablespoons of veggie oil.
Bag the meat, give it a couple of shakes, and store in the shade, away from insects. Now, if you want to skip this extra step, you can go ahead and start preparing the meat for pan-frying. To do that, unpack your meat, season on all sides with salt and pepper. Don’t forget to rub the chunk with a little bit of veggie oil.
Related: Bean and Rice Survival Soup – Easy and Adaptable Recipe
Step 3. Pan-frying the meat.
Once the fire has started to gain momentum, drizzle some oil in your frying pan and place on top. When the oil reaches the cooking temp, take the beef chuck, and place in the pan (fat part down). You only need to sear the meat – two minutes on each side is more than enough. When it’s done, take it out of the frying pan.
Step 4. Oven-roasting
In the same frying pan, add some more oil, and a splash of water. Make sure that there are still coals in your firebox. Next, you will need to place the meat in the pan, pop the lid, secure it with paper clips, if you have any, and to place it over your firebox.
Leave for 30 minutes to cook. After that, grab some hot coals from the firebox and place them on top of the frying pan’s lid – this will ensure that your beef will be cooked on both sides.
Now, there’s not much left to do but to sit and wait. Keep an eye on the coals and add some more if you feel like the fire’s ‘losing its touch.’ The first time I made this dish, I was with the whole gang: wife, kids, best friend, his SO, dogs, and, yes, even the cat (taught it how to walk on a leash). Our pastime of choice was obviously cracking open a few cold ones and reminiscing.
Well, if you really want to make more out of your camping trip, you can spend this time looking for side-dishes that pairs well with the beef like wild mushrooms or even fish.
Anyway, do keep in mind that this is going to take a while, so, there’s no point to guarding the firebox.
Related: How To Make Delicious Lard With 2 Years Shelf-Life (+ 5 Tasty Recipes)
Step 5. Twist and turn.
After about four-and-a-half hours, remove the coals from the lid. Pop it open and flip your roast. Careful not to drop it or it’s bye-bye dinner. When you’re done, put the lid back again and continue cooking it for about two-and-a-half hours. Don’t forget about the coals.
Advice: if you want to add a crunchy crust to your meat, you can ditch the lid after six-and-a-half hours. Flip the meat now and then. If you run out of the liquid, add a bit of water. Otherwise, the meat will dry up and, eventually, turn into ashes (true story!).
Step 6. Gravy all around!
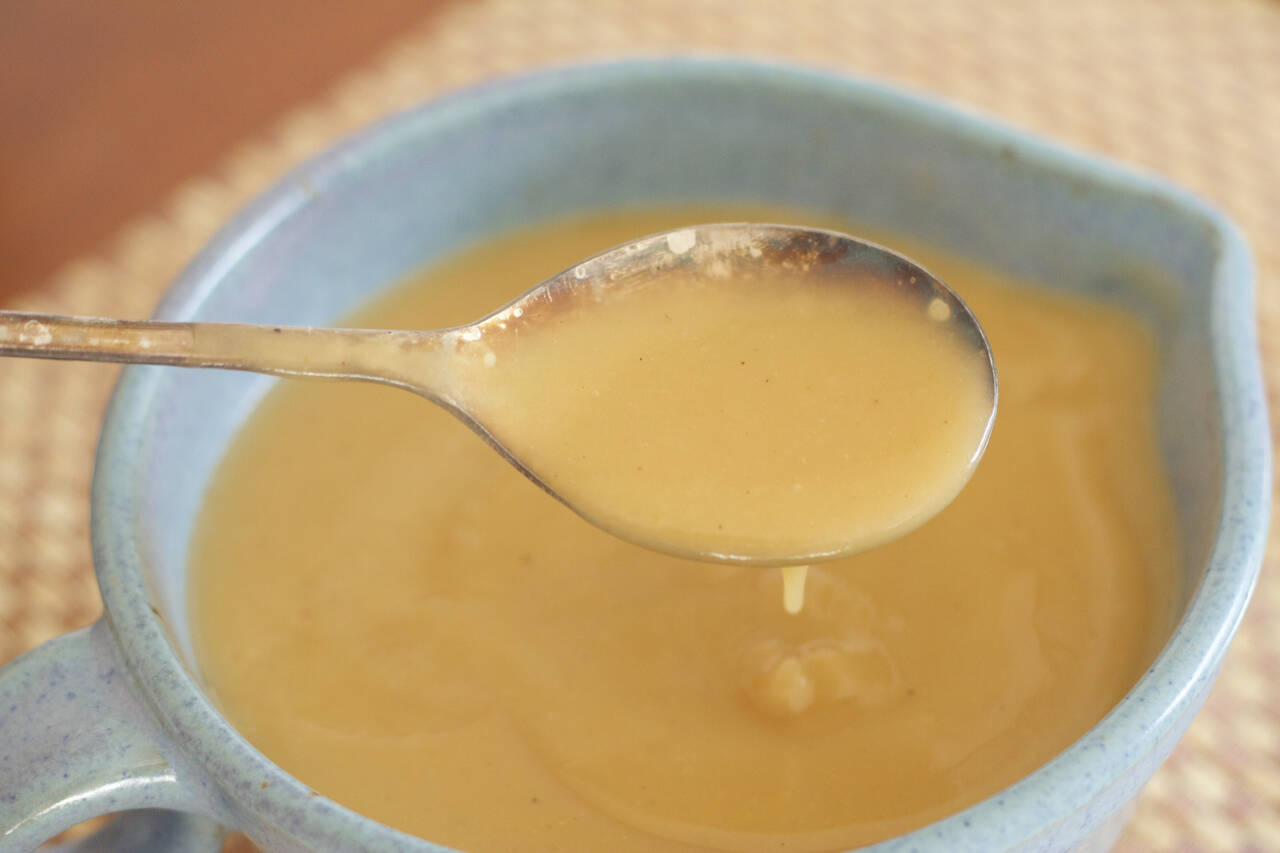
When the beef’s done the cooking, don’t throw away the liquid in the frying pan. Use it instead to prepare a mouthwatering gravy that will everyone a run for their money. Yeah, I know that this qualifies as an extra step, far from the simple dish – simple tools ideal, but trust me when I say that the gravy made from beef feet is the best thing that ever happened to your mouth.
So, here’s what you’ll need to do in order to prepare a simple gravy:
- Pour your beef stock in a separate container.
- Add a little bit of butter to the same pan.
- Wait for the butter to melt then add the stock.
- Let it simmer for a couple of minutes.
- Add half a cup of all-purpose flour and whisk the mixture.
- When the composition becomes silky-smooth, add another half a cup of all-purpose flour.
- Give a few more whisks and allow it to cook for another minute or so.
- Add salt and pepper.
Advice: if you prefer smoother gravy, you can strain it a couple of times through a sieve or a piece of gauze.
That’s it! You now have a nice cup of gravy which pairs wonderfully with the 7-hour beef.
Related: How to Make Dandelion Bread (Recipe Inside)
Additional considerations on the 7-hour beef roast
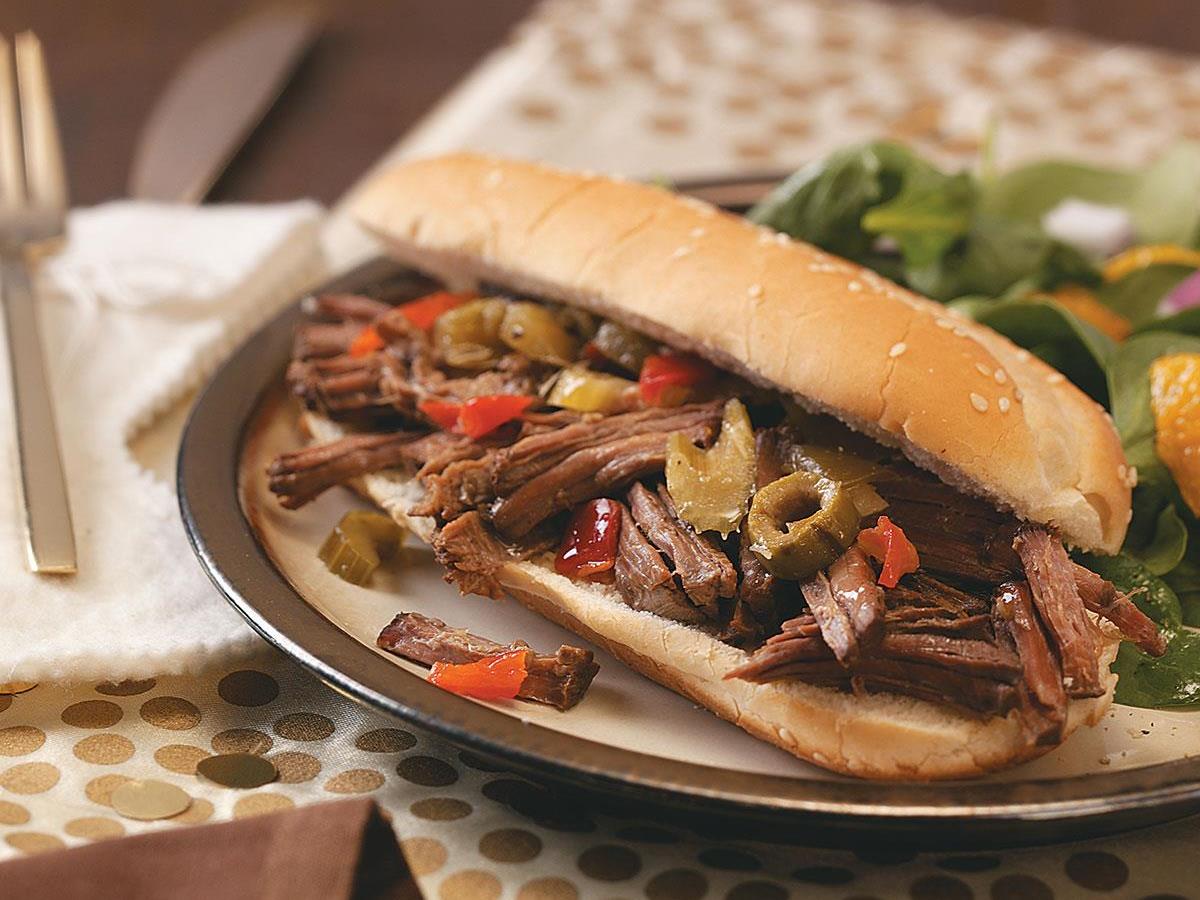
As you see, preparing this dish is easy, and you only need a handful of tools to get the job done. Now, you’re probably wondering about how to serve this ginormous beef roast. It’s all up to you, of course, but it would be a shame not to make some pulled meat sandwiches. Yes, I know that you usually prepare those with pork, but, hey, beef’s good too. So, here’s what to do in order to prepare some juicy pulled beef sandwiches from your roast.
Step 1. Get yourself a couple of bread slices.
Step 2. Put a metal plate over your firebox and drizzle it with some cold water. You can also add some veggie oil.
Step 3. Grill the slices on both sides. Don’t burn them, though.
Step 4. Put some of that gravy on each slice.
Step 5. Place your roast in a small tray and use two forks to pull the meat apart. Better you do this while the meat’s still hot.
Step 6. Take some meat shreds and place on each bread slice. Add more gravy if you like. Now, if you fancy carrying around more veggies and ingredients, you can garnish the sandwich with onion rings and a piece of cedar cheese.
Well, campers, that’s about it for my 7-hour roast beef recipe. Hope you’ve enjoyed it as much as I did cooking it. Sorry for not posting any clips or anything, but there was hardly anything left to be shot after everyone dug in (beer will do that for you). Anyway, if you have any questions or think that the recipe can be improved in any way, don’t be a stranger and hit the comments section.


 in Cereal?")

