

Abundant clean water is commonly known as one of the top priorities for survival, with most survival instructors stating that for drinking and cooking, you need at least a gallon per person per day.
Using a filter is the most common means of purifying water, but there are other choices, such as:
– Boiling the water – It is difficult to purify enough water to meet the survival needs of a family or community, and you will still have to filter the particles.
– Chemical purification (such as the use of chlorine) needs adequate chlorine stocks to last through the crisis.
And so bio-filters appear to be your best choice in a crisis. Bio-filters can easily be produced out of materials that are readily accessible. They effectively replicate the same method, but on a much smaller scale, that a water treatment plant uses to purify water. Dissolved and suspended solids, as well as almost all waterborne pathogens, are eliminated by this multi-stage procedure.
The significant part of water filtration is the pathogens. Bacteria and protozoa that can invade our digestive tracts, causing diarrhea and dehydration, are such pathogens. Left long enough, by dehydration, they can cause death. More than anything, they are the secret ingredient in most sources of fresh water that can make us sick. So, our attention has to be on that.
How a Bio-Filter Works
A bio-filter is a three stage filter, allowing each stage to provide a finer level of filtration.
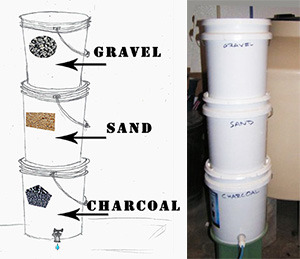 The first level consists of gravel and is there to remove larger solids, such as leaves, twigs, bugs and even pieces of feces that might be in the water.
- The second layer is sand, which will remove floating and dissolved particles of solids as the water passes through it.
- At this point, all that is left to be a problem is the microscopic pathogens, which are reduced by over 99 percent by the final layer, that of activated charcoal.
Related: The Easiest And Cheapest Way To Filter Water With Shungite
An incredible substance is activated charcoal. In which the pores have been opened, it is charcoal or carbon, extending the surface area. A minimum of 500 square meters per gram is the surface area of activated charcoal and can be three times as high. That is what makes it so popular. The wide area of the soil traps the bacteria, stopping them from going by.
It is possible to buy activated charcoal commercially, but it can be made as well. Treating charcoal with a hot acid or a solid base is the best way to produce it. This will cause it to open up the pores in the charcoal. Commercially, the wood is generally impregnated with vinegar, a base or salt before burning, by soaking the wood in it. Then, the pores open as the wood burns.
Building a Bio-Filter
There are a variety of ways in which your own bio-filter can be designed. In soda bottles or other small containers, several individuals attempt to make them. The issue with this is that the filtration is not as extensive as it is for larger filters. You want a thick layer of activated charcoal more than anything, so it can eliminate the bacteria from the water. So, I suggest using three 5-gallon buckets to create it.
To build your own bio-filter, you’ll need:
- 50 pound bag of sand
- 50 pound bag of pea gravel
- 25 pound bag of activated charcoal or carbon (volume will be about equal to the sand and gravel)
- Four 5-gallon buckets
- Screening (for replacing a torn window screen)
- Epoxy
- 3 ceramic wall tiles (like you would use in a bathroom shower)
- An electric drill with 1″ and 2″ hole saws
- Scissors
- Something to use as a stand, such as two cinder blocks standing on their end
We are able to use plenty of material by using three buckets to ensure that the bio-filter can work efficiently. This will also mean that the filter will survive for a long time, instead of easily being clogged up with waste. Essentially, the larger the filter, the longer it can filter efficiently and the better the filtering job it can do.
Prepare the Buckets
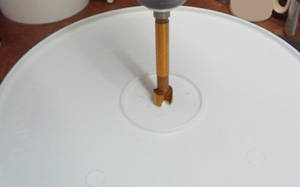
With each of them taking on one portion of the filtration process, you can stack the three buckets up. We need to create a path for the water to travel from one bucket to the next to make this possible. So, drill a hole in the bottom of three of the buckets using the electric drill and the 1″ hole saw. Then turn over to the 2″ hole saw and drill a hole in two of the buckets’ lids. Leave the top bucket’s lid alone.
For each of the buckets, cut a few 3′′ squares of the screening content. We will use more than one to give it additional power. These are epoxy in place, on the inside of the buckets, so that the 1 “holes you just drilled cover them. While the epoxy is healing, you could need to use something to keep the screening down.
Over the screening, put the ceramic tiles, shiny side up. There is a small amount of epoxy you can use in the corners.
Prepare the Filtering Media
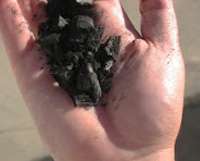
It is important to smash the activated charcoal, if it isn’t already. You don’t need it in order to be powder, but you need it to be small pieces, a few millimeters wide. It might already come this way, or in small sticks that are 2 mm (0.08 inches) in diameter and 1 cm long (0.4 inches) if you buy activated charcoal.
Start by rinsing all three meters of filter media (gravel, sand and activated charcoal). There will be dust and soil in the sand and gravel and the activated charcoal will have charcoal dust in it. It has to be rinsed out. Rinse five to ten pounds at a time using the extra bucket, fill the bucket with water, swish the media around in it and spill the water out. Repeat this process again and again, until the water is no longer cloudy.
This is the project’s boring part, but have patience. If you don’t have all the dirt and dust out now, you’re going to have to pour the first but a lot of gallons of water out of the filter before it begins to come out clean.
Put it in the appropriate bucket, gravel in one, sand in another and activated charcoal in a third, until all of it has been cleaned, as each batch of filter media has been cleaned.
Final Assembly and Use
Place the lids on the buckets of charcoal and sand and snap them into place. Place the two cinder blocks as far apart as you can at the center, while still allowing them to rest on the opposite edges of the bucket. On the cinder blocks, your bucket containing the activated charcoal needs to be put. To guarantee they are secure, wiggle the bucket and blocks.
Place the sand bucket on top of the activated charcoal bucket, making sure that it is centered. To ensure that everything is stable, check again. Lastly, to top off the stack, place the gravel bucket on top of the sand bucket. Do not snap the lid on the bucket of gravel, just allow it to sit loosely to keep dust and dirt out of it.
At one time, you should bring two to three gallons of water into the filter, pouring it into the top bucket (gravel) and then capping it. As a larger container would be a little uncomfortable to lift so high off the ground, I use a one gallon plastic pitcher. To catch the water as it is pumped through, place a container on the ground, between the cinder blocks.
For the water to percolate through the filter layers and come out of the bottom, it should take about 1/2 hour. Don’t be shocked that the first few gallons will turn out to be murky. That’s all dust you haven’t been able to scrub off. Keep filtering the water, and it’ll stop soon. You will then be able to drink the water that has been filtered into your bio-filter safely.


 in Cereal?")


Could you use activated charcoal that is used in aquariums?