

Oh, how I love food! Let me count the ways. Actually, I don’t like food-food, but the homemade variety. And nothing beats a meal cooked during an SHTF situation. Yes, I know how that sounds, but admit it that the best meal you’ve ever eaten was back when your can was on the line.
Even spam taste better when it’s eating from tin plate set beside a romantic 24-hours emergency candle. Which brings us to the topic du jour – how to make spam at home. I know most of you people have enough cans in your emergency supplies pantry to make it through WWIII, but wouldn’t it be neat to learn how to make some yourself instead of buying?
Sure it would, and I am going to show you how easy it is to make this stuff. What can I say about spam? The dish is so popular that it inspired songs and even phrases like the one we use each day: “for when the spam hits the fan.”
Now, as for the recipe, I have to warn you that it takes a little of muscle to pull this through because everything will have to chop, diced, and ground. So, without further ado, here’s how to prepare emergency spam.
Ingredients:
- Pork shoulder (about two-and-a-half pounds). You can use other pork cuts as well. Just be sure that your cut of choice has enough fat on it.
- Good-quality ham (about three ounces).
- Tender Quick Meat Cure (bought mine from Amazon. Aim from one tablespoon at first and then half a tablespoon later.
- Garlic (two cloves are more than enough for this recipe).
Already gathered your ingredients? Great! Then it’s time for phase two of our spam cookery.
Related: 59 Long-Term Survival Foods and Supplies from the Grocery Store
How to prepare homemade spam
Step 1. Get your oven ready. Pre-heat to 300 degrees Fahrenheit.
Step 2. Tend to the meat. Take your pork shoulder or cut of choice and cut it into small cubes.
Step 3. Set up your grinder. After you finish installing the thingy, grind the pork shoulder cubes. If you prefer your mixture to be less chunky, grind the meat one more time.
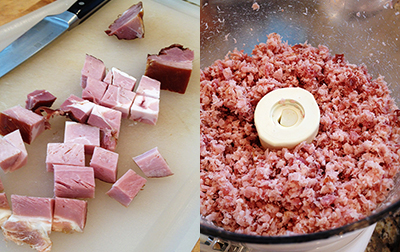
Step 4. Ham and garlic. Take your ham and mince it. Place it afterward in a food processor. Now mince your garlic and add it to the ham.
Step 5. Finely mince the ham and garlic. Don’t make it into a paste, though.
Step 6. Grab a large bowl and wash your hands. Place the ground pork meat, ham, and garlic in a large bowl. Add one tablespoon of Tender Quick Meat Cure and use your hands to mix the ingredients. If the mix seems too loose, add half of spoon of Tender Quick Meat Cure.
Step 7. It’s time to shape your ham. Grab a baking tray from the pantry. For this recipe, I used a small ceramic terrine tray my wife got from her mother. Put the mixture inside the tray and use your hands to spread the mixture over the entire surface.
Step 8. It’s oven time! By now, your oven should have reached the desired temp. Cover you spam tray with an aluminum foil. Make sure it’s wrapped around nice and tight, especially around the handles. Now, take a large baking tray from the pantry and place the spam tray smack in the middle. Fill the larger with water (should be ¾ full). Place in the oven for three to four hours. Check the larger tray every half an hour and make sure that there’s still water there.
Step 9. Time’s up! Let’s pop the lid. This is the most important part of making ham. Remove the tray from the oven and allow it to cool for a bit. After that, use some gloves or something to get the spam tray out of the bigger tray. Have to warn you that this part’s a little bit disgusting.
Take the aluminum foil off the spam tray. That yellowish goo on top of your meat is pure fat. Take a ladle or a large spoon and remove the excess fat. Temporarily place it in a plate or bowl. After it cools down, throw it in the garbage because it cannot be reused. Don’t forget to leave a thin layer on fat on top of your spam.
Step 10. Bag and tag. Grab yourself a lid from the pantry and place it on top of the spam tray. All you need to do know is to find some sort of weight to put on top of the lid. This prevents the blob inside from expanding and from drawing too much moisture from the air. I used two small bricks to weigh down the lid, but you can use anything you have on hand as long as it’s heavy and keep the lid shut.
Step 11. The ice-man cometh! Place the tray with the weight on top inside the fridge. You can also turn this into full-blackout recipe by swapping the fridge with a cool and dry place. Don’t worry about the meat turning bad because it’s packed with enough salt.
Related: How To Make Survival Lamps With Used Cooking Oil and Mason Jars
That’s it! If you’ve gone through every step, you should have fresh, homemade spam in 24 hours or less. Now, bear in mind that this is not the canned spam variety which means that it doesn’t have a very long shelf life.
However, if you know a little bit about canning, you can go for the kill. I haven’t gotten around to canning my span mostly because I don’t know a thing about how to seal those blasted things. My mother told me that there’s a special tool for that job, but I’ve yet to discover it. Anyway, it’s not like there’s enough spam to can – my family made quick work of it.
Like my recipe? Let me know your thoughts in the comment section. Also, if you know of any canning method, I’ll be grateful if you would care to share it.


 in Cereal?")

