

Being prepared means providing fallback solutions that can help to provide you with essentials when the standard methods fail. When law and order breaks down, you’ve got the guns and abilities to protect your house. You should know which natural treatments to use until the drug runs out. Such fallbacks will not last forever, however, depending on how long a crisis lasts-and how serious it is – you will need to find backups for backups.
 Let us take a look at the lighting. Say the power grid has been down for years, you’re out of gasoline for the generator and the last box in the candle stockpile is nearly empty. How do you light up your home at night? As usual, history will provide us with the answers.At night, the ancient Romans were litt their homes, but they had no electricity. They had candles, but they were costly and smelly to use – in ancient Rome, beeswax was costly, so candles were made of rendered beef fat. Thankfully, a better solution has been found.
Rome had a huge, sophisticated olive oil industry with jars of Italian and Spanish oil shipped to every part of the Empire. It was used to cook – but large amounts were often used as lamp oil. Cleaner, cheaper and safer than candles, for decades, they were the primary source of light.
When you find yourself running out of the lighting options, this ancient technology can easily be resurrected.
Certainly, you may buy for them costly oil lamps and bottles of oil, but there is no need to bother. You can achieve just as good results with a vegetable oil-fuelled home-made lamp. Actually, vegetable oil as fuel, has some real advantages over lamp oil:
- You can re-purpose used cooking oil, giving you a zero-cost fuel and helping with waste disposal.
- Vegetable oil doesn’t give off toxic fumes as it burns. If you use olive oil, there isn’t even any odor.
- In the long term, vegetable oil is a renewable fuel. You can grow canola or sunflowers and extract oil from them.
Making a lamp
An oil lamp is the easiest kind of light source to make – making it much easier than a candle, and it will last much longer. In fact, oil lamps can still be used over 2,000 years old if you just add a new wick and fill them with oil. The basic design is unbelievably adaptable, too. A work lamp can be made from a wide variety of materials, including things that would otherwise go into the trash.
There are only two basic components to an oil lamp:
- A container to hold the oil
- A wick to draw oil up to where it can be burned
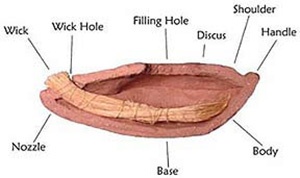
That’s really it. You’ll probably also need to improvise a wick holder, unless you’re using a lamp designed for purpose. Modern oil lamps were usually made of metal or clay and a wick holder was built into them. The lamp would sometimes look like a little flattened teapot, with a handle at one end and a spout at the other end – the wick would be inserted in the spout. If you’re good at pottery, making a replica of an old oil lamp is very easy. You’ll need to improvise otherwise – but an adapted light will work just as well.
Finding a container
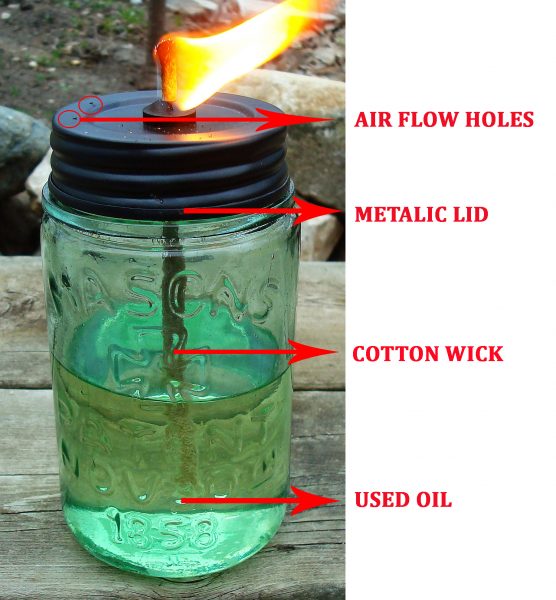
The first thing you need to do is get an appropriate container that can be converted into a lamp. Here is a complete list of choices. A glass container, particularly for outdoor use, can make a good lamp. Any small clay, metal or earthenware bowl can be turned into a lamp. A metal tin like the ones that some skin cream brands come in is also ideal.
If you’re using a jar, the best choice is to choose a shallow container that’s wider than deep. For that there are two explanations. One is that oil rates aren’t going to fall as quickly. The other is that it’s safer, because it’s difficult to knock and spill over. That said, although they have naked flame oil lamps, they’re pretty safe actually. Usually, if one gets knocked over the spilled oil, the wick will be put out. Also, leaving them unsupervised is not a good idea, particularly when there are kids around, but they are much better than candles.
Making a wick
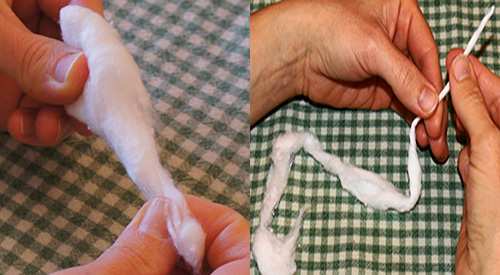
For a wick, you need a piece of twine or cord made of natural fibres. Do not use synthetic fiber-melting and possibly burning, releasing toxic fumes.Cotton is ideal, but flax, nettle and other natural materials will work, too.Look for a cord with a fairly smooth surface, if you use a rough or hairy cord it’s likely to char badly. You might also be able to use silica cord as a wick, this is very heat-resistant, but all kinds of oil might not be wicked very well.
You want your wick to have a fairly thick cord – it’s perfect just under a quarter inch. If all you’ve got is thinner twine, twist it. Take a few feet of twine, tie one end to something, and twist the other end until it is tensioned and stiff. Then, hold some tension on it so that it doesn’t knot up, put together the ends and let go of the center. It will coil around itself as it unwinds, creating a thicker thread. The tighter you can get it twisted, the better. If you start with a really thin twine this process can be repeated until your wick is thick enough.
Holding it together
Now you’ve got to find a way to hold the wick in. If you use a metal tin with a lid, there is a simple solution -just punch a hole in the lid, slightly smaller in diameter than the wick. Then wrap one end of the wick in tape to stop it from snagging and feed it from below through the hole. Next, remove the tape and pull back the wick until approximately a quarter inch is projected through the lid. You don’t want anything more than this, otherwise it’s going to burn oil too quickly and create a smoky flame. It’s likely the wick itself will burn, too.
When using a bowl or jar, make a wick stand out from the string. For this, it’s best to use stainless steel wire and it doesn’t have to be very thick – just enough to withstand the wick’s own weight and that. Galvanized wire may also be used, but first take off the zinc coating with sandpaper – if heated, it can emit poisonous fumes. Copper works too, but regular cleaning is needed. The green oxide coating that it forms can also emit poisonous fumes.
Related: How to Make Black Garlic For Boosting Your Immune System
To make the stand; start with a thick nail and wind one end of the wire wound it to form a coil. Just a half-dozen turns are required. Now bend the wire so it’s aligned with the coil and leave a straight length, just long enough to keep the coil about a quarter inch above where the oil’s surface is. Finally, bend the remaining wire into a triangular base so it stands upright. Now, feed the wick through the coil so that a quarter inch pokes out, stand the holder in the bowl or jar upright, and you’re done.
Whichever type of wick holder you use, make sure the wick’s tail is long enough to be lying on the bottom of the container for a few inches.
So, now you have made your lamp with oil. Now, you just have to fill it up with oil. Any type of vegetable oil is going to do, olive is best; but the others are working well too. When cooking oil is used, strain it to pull out any crispy bits, then simply pour it into the pan.
Before you first use the lamp, let the oil stand for long enough to soak the entire wick. Then, just light it up. If the flame is too smoky, slightly travel the top of the wick until it burns clean, if it is too small or often goes out, push a fraction of an inch more wick through the lid or coil.


 in Cereal?")

